Sunday, October 31, 2010

Boogity boo! :D


I dunno, this morning while my fellow was doing something online I felt inspired to goof around & strive for a bit more scary after all. :) BOO!

In part this post is about me being a twerp for a good & dear friend who (rightfully so) insisted that it's not a great idea to post a picture every time I flick an ear. Hahaha... sooooooo this morning I decided to flick an ear & open a mouth. Next I'm going to turn this overworked lump into a turkey for thanksgiving... at least that'll give this page a break from these absolutely non-new-item postings!! ;) (Ah but no seriously, a little levity is all I've got at the moment so hopefully my silly won't be misunderstood- it's all in good fun man!). :D


HAPPY HALLOWEEN!!! :D

Saturday, October 30, 2010

For Halloween a (sorta) new face?


I dunno.. it's a little scary still yes? Well ok, no.. but he looks a little scared to me.. ha!.. Anyhow, I have no plans for this fellow.. just like my guys from the 14th aren't going anywhere, this guy isn't either (don't panic, I haven't lost my mind).

This guy was fun though to transform from my originally pony to warmblood type, back and forth, back and forth - smoosh and flatten..he's a perfect size for exercising my mind to think about what planes belong where, on who (WB vs pony) and why (who's jowl/eye/nostril/whatever is higher/lower/smaller etc etc). It's obviously still veeeeery exciting for me to have the ability to moosh around my initial form & gesture work like this, for days rather than a few hours. Much more liberating to not have to commit to a pose nor a build. :D Don't worry, I've got real things to focus on so he's not getting a lot of attention - since I made & shared him here before (the 21st I guess), I've only played with him while I caught up on the phone yesterday - and tonight while watching Sleepy Hollow. His other side is a all hacked up/hardly looks like anything but geometric shapes. He's too big to serve as a tack holder. Busts, ones like this too, are a dime a dozen too and he's big enough to be too costly to produce right now for a lark. SO, he's just an exercise mat for my sculpting brain for the time being .....AND of course all I've got for Halloweenee here. Have a spooky one though guys!:)

Thursday, October 28, 2010

What IS this odd tangent w/these pretend bronzes all about?


Well the last weren't precisely "pretend" - this one is "faux" though. :) I'm just sharing them because, well, otherwise most of these pics may never see the light of public day for any other reason.

I've been preparing photos for a # of non-hobby uses (well ok, and a couple of hobby ones). Horse magazine ads & competitions, and page on my website, so this is why I finally decided to photograph my little herd of cold cast and faux bronzes. (Faux bronze literally translates to mean "fake bronze" - in other words painted. Cold cast isn't "fake" per say because it's real bronze metal). For those who wondered about that on my medallion ordering link there of the swatches (I did!) the casting company had? That's the terminology. I have to admit that their faux bronze is a LOT more realistic looking than mine is.. I'll have to ask Sheri how she painted that. In the meantime, here's this gal. :)


adding this in;
http://mksculpt.blogspot.com/2010/09/tossing-aside-paint-brush-and-more.html
The picture there is the one on my brochure I had made this spring. MAN do I wish I had the photos I do now of dinky instead of that one there. Black is not the way to photograph brown horses (this is a duh to everyone but me, I know). I don't think I really had a point otherwise. I would like a re-do on that please. :)

You can also read too more on my obsession with doing life sized horses at some point... if I can't afford it, I may return to trying to do so with other media. I did this in college - a 1 room studio apt, 2 dogs and a cat. And a reasonably large horse sculpture made from some wood putty powder stuff. It started to fall to bits before I was done so that was given up. But my fiance has wood carving tools galore... the lure is strong... must make big. Must! ;)

Tuesday, October 26, 2010

Cold cast metals & me! :) (Holiday ornaments)


Click to enlarge immensely!
New holiday ornament bas relief horsies up on website (http://www.artbymorgen.com) . For something entirely else here I've been photographing my cold cast pieces yesterday so I realized I could share them here - well at least a few pics - and give folks an idea of what this mysterious matter "cold cast" is (although folks at Breyerfest got to see these and there's a blog post below with them all together on a shelf). Compare these to the gal on my front page of my site there for example... in real life the difference between painted and the dark finished/polished metal is immediately obviously. My hand painted little arabian there probably should get sealed though too.. that might make the difference less obvious, I'm just not entirely sure which to try. I've done others and haven't liked the results. I'm not ready to tackle wax polishes as you would a real bronze or cold casting.

Soooooo for several years now I've made my own copy of each of my resins a "cold cast" bronze. I haven't collected them all yet (it does cost me a little more than double the cost of a normal resin). They have seams, so seamless things like medallion ornaments are one thing.. multi-part molded whole bodies of horses are another. The seams, even when cleaned up, do not clean up seamlessly like real bronze. You can see this on the pictures here if you enlarge them. I probably won't get one for either of my 2 largest horses - cold casting of metal into resin also increases the weight significantly - so you take a resin that's normally hollow, double that and then add another half for good measure! I fact for anyone considering it for their own horses I'd urge you to consider doubling up on the wires. 2 of mine have warped somewhat under their own weight.

The above is my Godiva resin and she's the lightest colored bronze I've gotten to date. I also REALLY stripped her darker polish color off by getting gunky on her and using (yes, prepare to want to smack me), using window cleaner pretty vigorously before I thought about what I was doing....I know, I know. So this isn't truly a fair example of how the darker points look because a little bit was cleaned off. Like bronze a like sealing wax /polish is the thing (not ammonia) ;) That gal has been through the ringer - she's been repaired too. Cold cast resins DO break. It's the poor artist's bronze, make no mistake!

This 3.5" tall "dinky duke" (who's creation is shown earlier in this blog from several years ago), is REALLY dark. Although in natural light he has pretty crisp highlights.


This close up is about the best I got of "realistic" color. Mind you they look terrific under display lighting, and pretty dark in dimmer lighting.. as with any bronze.

Mind you bronzes come in all sorts of shades too. AND the castings have variation, so some are darker/golder than others. I'm just dying to see what the silver and copper castings look like myself! :) Until next week...

And the new faces are quite old to here too now.. but here are those guys all wrapped up. By next week I hope to have actual cold cast metal ones to photograph so buyers can have a little more confidence in what they look like. I'm pretty tickled at how these came out. I do wish I could afford to donate cold cast metallic ones to shows like I do with unpainted resins, but it's just a bit too much for my budget this year. I've been trying to think of ways to help out shows still but I'm just at a loss! My last couple of show donations were OF horses. No seriously! (Well the more valuable ones were - at least I think they sell normally for more than these $35 retail value medallions I normally donate). Truth be told though I have had no luck ever selling OFs and figure if it's pristine I should get rid of it before I do any damage to it. Kinda not kidding sadly. Anyhow, so there's my little public service babble to remind people to donate to show holders whenever they think of it. In the meantime, back to the medallions & that saga's the end result (again I did NOT succeed with the Smooth On 305 and wound up having the casters make me these prototypes! :)

Obviously the above guy is named Bravo - in a little nod to his Spanish body type, and also for the fun of keeping the auditory & ICAO thing going too. I couldn't find a suitable auditory name for this gal, although I'd played with the idea of things like "Hear No Evil" and "Bell"... I wound up calling her "Serendipity" as a good luck charm. :)


Marketing fail over here. Editing to add in the link to the medallions http://www.artbymorgen.com/serendipity.htm and http://www.artbymorgen.com/bravo.htm
If you've read this far, you rock. :)

Thursday, October 21, 2010

All kinds of things here :)


Clearly from the picture there I’m still just incredibly inspired by the malabiltiy of modeling clay over [verses] apoxy sculpt still . No idea where the new bust is going (I started that tonight instead of a new medallion as I'm running out of relief ideas and am tossing a lot out so I wanted to switch it up by going fully 3d again). The black resin casting medallion is the prototype back from the casters, with all the little whisker bumps and such on her now... the other one just needs a touch up around the grass and he's ready to go out tomorrow/Sat too (well after a light mist of primer to make sure there's nothing missed there & take away the shiny some too).


I’m quite excited that the casters say they’ll be happy to make these medallions in their cold cast metallic finishes. These cold castings are just terrific. They look, feel and smell just like the real foundry created thing because they are metal (bronze, nickel-silver) powder added to the resin. Not to be confused with my metallic paint jobs- where I just use pearl and a few colors to mimic metals altogether… I would also like to try gold or copper leaf work someday. Perhaps someday soon! I’d like to make the mane/tails a different metal altogether. I have the most wonderful Fly Fishing resin by Kelly Savage of two horses grooming each other – she managed to pour two different metallic resins into the same mold to make a pewter colored and a bronzy colored horse. I adore this! They get “polished” so the relief areas are darker, it doesn’t look like NAN plaques for example. It’s very easy to confuse with the real thing until you pick up a bigger piece. I have my own personal copies of my resins in, which works for me b/c they can get shuffled around a lot, like right now everyone is jumbled into a box waiting for display shelves to go up. And I don’t have to worry about finishes getting damaged while they’re in storage.

One thing I’ve been neglecting badly is finishwork commissions. I’ve written to everyone who has a horse here now so if you haven’t heard from me well.. my emails haven’t gotten through? Anyhow, as they know, I have a small ton of things making it physically hard to paint over here, but after I wrap up these medallions tonight (tomorrow am?).. well it’ll be time to push away from the sculpting table for a bit until these last paint jobs are wrapped up.

I have that maroon Morganesque (baroque!) ;) pony there (Johann) so that I’ll be pushing myself harder to address the long overdue painted horses to get back to that to wrapping him up before the end of this year. I may do like I did with bitty & release to my group only, just before Christmas until the end of the year rather than just a shorter time period. Just haven't decided yet, so hard to gauge the market to be totally honest. I hope I can trust myself to work on him only in short stints if I’m making good headway on the finished horses that have priority now…. Bottom line is the pace needs to pick up here for me in a bunch of ways basically. The humidity and temp fluxuations in here have gone way down so that’ll help a LOT in the painting area too (being more comfortable). I’ll still be working side by side with another human in here in a pretty small area but that’s just a “deal with it” deal I guess (we can spend camping trips in similarly small spaces together… I suppose this bodes well for when he retires and will be around all the time again). I do kind of miss listening to my blaring TV (tuning it out all day long). So ironically it’s MORE quiet with him around all the time (like a library). ;)

So.. once more I’m up late here. Hope it all made sense. My early morning and late even compositions rarely do. Just thought I should jot something down here about the medallions being done basically & especially about the metallic options. I’d designed them from the beginning to be geared towards this look for my family gifts but they do cost me almost 3x more so I dunno if I’ll try a mixture of painting and leaf or what I’ll do..

Ok, time for bed here - eep! Hopefully next week I'll be sharing the medallion page here. Before then news is limited to my group for a bit (yadda yadda always the same wording - sorry!). :)\

The wee mini in the left-most corner is not sculpted by me btw! That was a gift from Sonya Johnson - it's her mini Teke I thought was just terrific! The horse skeleton you see too was just recently (last week) assembled by my man as well (he assembled that whole horse skeleton so he could clean up more and get rid of the box... not kidding!). I have gotta laugh about this irony - I used to joke to my friends that I need to be rich enough to hire house boys to cook and clean for me... little did I know you don't need to be rich for this - ha! (:-P No but sincerely, how flipping sweet is he, eh? (I've assembled one long ago that broke to bits long ago so he knew I wasn't going to mess with one of those kits again! And he still did it. What a great guy.) :)

Thursday, October 14, 2010

Booger friends and obelisks :)


I'm thinking of them as obelisks for no really practical reason - it calls to mind 2001 & the scary challenging monolith to me. The low relief style of bas relief really IS challenging to me. But it's also a chance to elaborate on a story more than a typical model horse sculpture allows.

If it paid the bills more I might sculpt horses galloping with riders through the sage brush or hunters jostling each other over a small farm gate in a fox hunt (just off the top of my head - these aren't ideas that have moved me, I just like scenery as evidenced by Flitwick's wall!). Anyhow, so here I can impart some hint of a story...but since I'm trying to work out my 2D/3D perspective grasp, I decided to go very narrow and force myself to try and cope.

One of these was done using a few very accurate angled reference photos and one was not. I hope it's pretty obvious which one was done without looking at anything at all. Yeahhhhh....

So a booger friend (this is all related!) ;) is what waitresses I've worked with in the past called you if you were honest enough to point out a boogie. Because NO ONE really likes to look up while they're ordering a meal and see that up the nostril of a waitress. So you were pretty darn grateful to be told the truth rather than spend the night wondering why customers were so distant and tips down (yes, subconsciously it happens when your waitress grosses you out!).

Anyhow, so I've always really appreciated people who've been brutally honest with me. My fiance is a great booger friend to me. And he was very tactful but clear about saying "these aren't very good". I love that. Anyhow, no need to spare my feelings guys - I'm not liking em all that much just yet myself.

I may never work out the issues I have with them. The issue, I know this from illustration work, is that I don't mentally render 3d objects into 2d planes easily. I work just fine from photos I suppose but I stink at pushing my own depth perception down flat. When I was doing illustrations freelance and wanted to get into medical illustration more I submitted a portfolio to a top illustrator working for a national museum who for some reason did critiques (it was a while ago, I'm sorry I don't remember why but it's worth looking up people who will do this who can offer tips and suggestions). One thing that surprised me was that she mistook all of my real life study sketches for works from photos, and photo-studies for works done from real life specimens. I was really confused by this and it took me YEARS to figure out that it was due to my issues in depth and perspective. At least I've got a boogie friend around to help warn me about it though! ;)

Right now it tickles my fancy (or I would've smushed it up already!) as some silly kind of medieval art. I can almost see some friar or servant of some sort being appropriate (I've seen too many medieval horse related fresco paintings at this angle in other words).

And last but not least, a silly chorus line... they're filled with pin holes - possibly uncured resin. Not safe at all. But boy are they fun to line up like this (and yes to arrange in other ways). Some of the out-take gang. The casters are making me real prototype castings. This particular resin in this climate was bad news bears for me!


I just got a kick out of them. The color gradient is a single drop more of black dye for each (1 to 4 drops).

I just like colored resin in general for seeing shape and prepping prototypes for production. I've offered them in the past but they aren't so popular (and let me reiterate that the undyed resin I got is bad, it wasn't the dye.. we very well may have let the humid air at it too long and just not be dry enough here to cast with in general). Anyhow, but reflecting light away makes for seeing every little surface detail so much easier than the white which is absorbing some of it. I work in stark light but over the years I'm coming to loath trying to prep nearly invisible seams on white horses. Yet I hate to add even one more layer of primer than is necessary (so I try to do just one final last layer), when it comes to holding in detail on a sculpture that's going to be cast. I went with white primer for only one sculpture and I really regretted that to the bitter end. :D Photographing him was a trial for me too. Anyhow, wow - minor essay here entitled "why I love resins in any color but white". ;)

Great fall feeling evening here finally! :D Hope everyone has been enjoying it - off to help install heaters now here though... it won't be hitting 90 too many more times here I suppose. ;)

Monday, October 11, 2010

Had to stop playing around for a day here...

BUT in the meantime I spoke with the casters and they seem to feel it's the Smooth On 305 that's the likely culprit.

I have a couple of castings that are prototype-worthy to add final details to. But I'm going to see if they can get a cleaner one for me. For the cost of the USPS flat rate box... and a few bucks to them for resin, it's worth it for me not to waste a day playing around with bubbles if they can get a better one. The mold is pretty nice and while I've been beating on em with casting after casting - and a bit or two torn off from mane undercuts... yet I think they've got lots of life left.. ;)

I have a MOST awesome bunch of tips coming up about pin-holes and bubbles next though. Gotta recharge camera batteries. These are just too perfect as examples not to use to share the info. Trots off to bed now & to pop the batteries in the recharger. ;)

Sunday, October 10, 2010

Bubblefest 2010! (molds work..now to learn how to cast proper)


Ok, so I've mastered the art of measuring. I kid you not I've eyeballed out the 2 pt mix resin volume for both castings with zero to spare. This is what remains of my drinking-games days. I used to want to bartend and would pour perfect shots every time into any type of cup. I guess this helped in the lab too.. except for when I spilled acid all over my benchtops. Yes, not the field for me to work in. Here you see how I spill all over the counter. Got the right amount inside of the cup... but a little over here and there too. (This is also why bartending never worked out for me either). ;)


My fiance did the other pouring... here's what happens when I try to pour gooey liquids.. this isn't the half of it actually. Somehow it got ALL over all the bottles. Wasteful wasteful tsk tsk -sighs-

First we did white resin;

The mold is full of clear liquid - this is really hard to show of course. Then when the reaction starts to happen this cloud of opacity spreads out. It's quite cool to see. I am wearing a mask & there's a big fan going on over here btw.

So I could see in the white resin that there were bazillions of little surface bubbles. So I decided to just give the black stuff a test again too. Yesterday's test of the 2 colors (normal white or with black dye added) showed interesting results for how the bubbles broke up differently in the black dyed one. Could've been temperature, stirring, our own mixing ratio differences. Lord only knows, seriously! THIS is why I don't have the slightest interest in casting my own en mass. I see these small armies of castings my fellow sculptors turn out and my hat goes off to them. We'll see.

Air bubble fest - this is NOT a surprise, I knew this was the main issue to begin with (the 2nd issue being consistently mixing things properly. Some swear by this or that, my own casters use baby powder and swear it's the reason they don't get surface bubbles. But they don't use much release agent as a result. Anyhow, so I wasn't sure they could mix - twas digging around online just as Becky Turner's comment off of my last post came in & she described to me how the baby powder can go WITH the resin release (and to tap it around like cake pan coating) so we'll see. I'll wait until the casting is done in another 20min before I post this!

My first castings in pure white (also helped to clean off clay from the mold - interesting!) were ok for a first try! I'm trying to fill in the grass on the standing boy & the mane more on the head so that these will be thicker for production castings. Thin on any kind of casting lead to bubbles and uncast spots. Anyhow, though, I got little eartip missing holes and nostril bubbles, the bigger kind... and millions of wee ones that hadn't quite broken the surface so they look like a small disease coating the surface? Soooooooo we went with a different pouring/mixing style and black dye to confirm that we stink at this! :D No seriously, you have GOT to enlarge these to understand just HOW MANY bubbles there are. These are nearly impossible to salvage;


I'll admit too that I'm a little sad the detail isn't as crisp as I thought it would be in some spots, although the above photo is out of focus on the horse and focused more on my finger prints -wow! This though is precisely why I wouldn't have sent clay to be cast finally & left off the facial vein there too.

Btw, the mane flashing excess is intentional - I sculpted the mane tips pretty thin so we leveled these where this area is (if not100% level) going to be the planar low point.. thus it'll be the thickest point of the casting. And all I have to do is trim around it and carefully cut out the loops & whirls.


I still wuvs the nosie nose though! :D (If you enlarge this you'll see the air bubbles at their most shocking!!!) (:-o Ok, I think I've figured out what this is... it's Falcor from the Never Ending Story isn't it... I'm SO unoriginal I really am! UGH!

Anyhow, this one isn't as bad as the next one WITH baby powder - believe it or not!

I'm gonna run for now and go look up some things about this. The lowest/deepest spots where it catalyzes first are the spots where the most bubbles form up. And we're pouring slow, thinly, and doing it all as they tell us to. With and without dye too. Time to watch some online vids & find a trouble shooting section.

Well truth is, if I have to I can work with the one in my hand here. The black (which is blue to purple in reality unless a LOT is used)... is nice at least for showing every little flaw very well. I would have all my resins cast in black except I know it's more work for the casters and surprisingly few people want it because many people start painting with white primer (verses reds or greys).

Ok, off to research during this next half hour. I'm very pessimistic about the one we just poured given how the bubbles coalesced in the same way as the worst one before it. Hrmm... ;)


Edit 20min later to add this in;

Hmmm castings get worse as day rolls on...
http://www.smooth-on.com/faq_display.php?faq_id=3&cID=2 (so many possible things to rule out!)
like... hmm..
Humidity has gone DOWN today here but maybe not in the work building I'm using?

Release agent here sounds like the # 1 likely suspect from what they're saying.. it's time for me to demold the next batch so we'll see..

Edit ~1hr later to add this in;
Seems like the bubbles continue to come from the most creased parts of the mold. Trapped moisture? Release agent still?

White castings came out ok.. possibly the least pin-holed (no release agent used, just powder - thinking there may be some release agent still trapped inside however). Now black (with less dye) is curing up as I type.

My fiance officially finds this to be NO fun. I asked him if he's enjoying being surrounded by horsies and he said "no"... :-/ My hand-steady skills will have to improve here for this.

This stuff is expensive to be experimenting with like this. This is why I'm watching, taking notes all over the place (the flashing on these castings is covered in notes). :-P

It's almost like science again. Except unlike microbiology I can really see this stuff sprout to life before my eyes! (The child in me is gratified). ;)

Saturday, October 9, 2010

And now for a very long wait...! ;)

While I wait I'll share more in depth thoughts I haven't made very clear. I probably sound exceptionally manic (which is fine for an artist I guess) in comparison to my typical blog rambles and meanderings. I realized I may not have made it totally clear why the "sudden" switchover from apoxies to clays here. Before I show my little days adventure pics below, I'll share why's & when's of that decision... I've actually been planning to get into modeling clay again when I moved down here and finally had the ability to cast outdoors (apartment living is not great for casting). I rented a barn before, but I didn't have my backup plan of living near people who can help me cast waste molds if need be before.. now we still don't own, but we have a lot more outside than before! (And warmer too - whew!) ;)

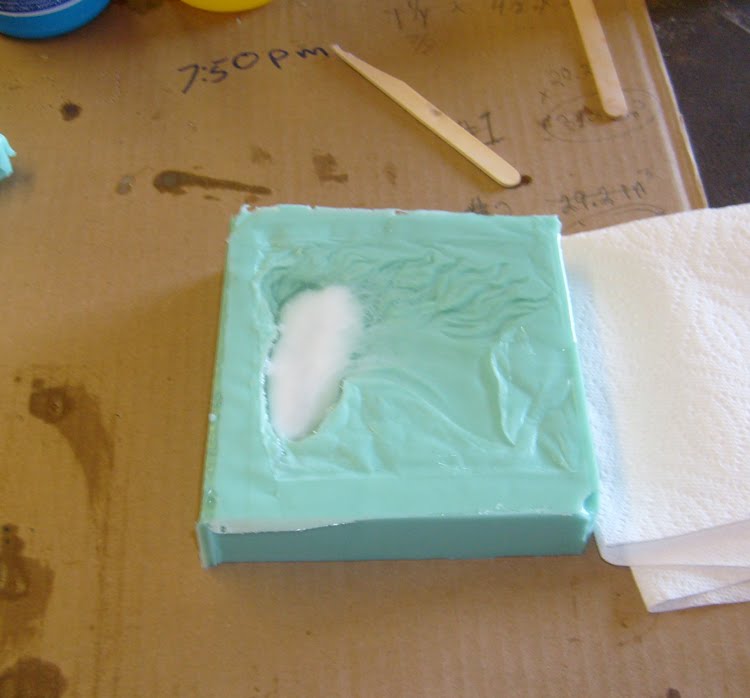
First though, I had to take "final" pictures of the clay in case it was the last time I see these guys like this! ;) They're being molded right now and it all could be for naught if the silicone rubber doesn't cure right! (:-o I've had my own bad luck plenty and have heard so many other's scary stories as well.. (So far so good though -crossing fingers!-)...


Had fun with relief illusion of head-on look when the horse isn't actually looking head on at you...


Neoclassicism? Roccoco? Straight up Romanticism? Don't ask me, thhbt! lol! No but seriously, I've always been very into Greek and Roman relief work and that very romantic style of Stubbs (with his exaggerated eyes and wildly curly wavy hair)... & let me tell you that is NOT easy either in Apoxy Sculpt.. ;) So "weeeee" again! :D

I float between wondering whether she was inspired by Stubbs or (eek snort) Fuseli (go look him up) ;)…! I’d would like to plead that I was inspired by Stubbs though..! ;) Or Raphael since I have most cool prints by both and very few other framed horse pictures around here (clearly I dig em).

Relatively speaking molding & casting is nothing big of course for most people - I know - I know... ... but for me this is the toughest part. I get attached to works when I make them, once I'm done it doesn't bother me if they're destroyed even but before then, it's hard. & I'm not totally done yet! Pictures below of this morning's folly!

See for years I’ve been wanting to go back to sculpting in softer clay – not necessarily “soft” clay but modeling clay verses 2 part hardening epoxy which acts like clay for 1-3hrs and then “cures” into something very similar to soap stone. I’ve been wanting to sculpt again in something that stays more malleable permanently than this rock-solid Apoxie Sculpt I currently work in. Something where the proportion or pose can be changed SO much more easily be adjusted at ANY point in the sculpting process… which is a major issue/challenge for me with Apoxy. If you’ve followed my works over the years you see me changing some pretty significant things right up toward the end of the pieces’ completion – a whole shoulder shifting, neck length changes…this sort of thing. When I talk with my fellow sculptors who work exclusively in clay we have these discussions “so how do you go about changing something like this in your medium”.

An example of details that take me weeks to get in Apoxie Sculpt - took only an evening or two basically in clay.

There are challenges in clay too, after a certain point you risk ruining a lot of hard won detail – this isn’t such an issue in apoxie sculpt for example – but making subtle changes overall is a LOT of work… so a minor shift to a more natural pose ALSO requires a million hours of tweaking every muscle that ties in (which can be the whole horse just about – hahaha!). Sometimes it’s a LOT easier too mind you. Especially something like lengthening the barrel. Every one of my sculptures have had the barrel lengthened – some by pretty significant amounts and others you could argue are still pretty short-backed (although in riding horses short backs are nice strong backs too so I tend to favor that look). Anyhow, I’ve heard some horror stories from fellow clay sculptors about lengthening a back for example.

So sure, clay isn’t a magic medium but it’s something I’ve been playing with since I was young and I’ve always really really liked.. I just never made anything too serious, due to the pain/risks/complexity & costs of casting. At least (I reasoned) with apoxie sculpt the sculptures I gave up on (there are MANY – like there were 2 iterations of Deputed Duke.. several of other horses that never went anywhere.. ). Anyhow, giving up on one only cost around $20 of wasted material and time.

In the past few years however I kept returning to the idea that I’d like to pick up again with clay. And a BIG draw of moving south is that I’m 5-6hrs from the casters and now I can drive my work over to them and let them make the waste mold if a sculpture is worth completing, and I'm at a loss for how best to cast a single casting - molding is only half the battle…! I’m not exaggerating about that, it was a big factor for me. Maybe I can watch them and someday feel confident enough to do a horse’s waste mold.. but frankly I’ve encountered some painful set backs. The cost of even one resin’s waste mold is too expensive for me to screw around with (silicone rubber in the several hundred dollar range). Some artists just go from clay to production mold and I suspect I’d be tempted too – with that sort of waste mold prototype-making cost…. However there are several reasons why that’s not ideal… so I kept hemming and hawing and just playing it safe (ala SLOW) with the Apoxie sculpt…

At any rate, so while I’ve got my current Apoxie Sculpt horse nearing completion now, and I’m just wildly excited about him – woot!! – well I’m also obviously greatly looking forward to my next 2 horses that I plan to do in clay! I’d started that wee pony in Apoxie Sculpt *but* there were some width issues with the hind legs I’ve been annoyed with and well (!) ;) what better excuse to start over in clay as well (and while I’m at it I’ll just go a wee tad smaller so that the pushy pony can be paired up with the inquisitive horse – I’m adoring the look of the scene and have no models currently that pair up well with each other.

It’s not a fair comparison time wise to compare my completion time on sculptures in various media since I haven’t been able to devote myself to a sculpture 100% since way back in 2005 with Bosco. Long days spent round the clock wrapping him up. That was the only time I was exclusively able to work F/T on sculpting (or painting) day after day, before & since then I’ve had 2 -3 jobs here aside from sculpting & painting. That said, overall I’m already finding the ole’ college and earlier lessons learning flooding back to me. Plus now there is the benefit of the internet to watch other artists working in videos on youtube for ideas/tips & inspiration! :)

Mind you I grew up with these things being given to me to entertain me (only child w/no other kids around very often). ;) I gave up on traditional water based and oil based clays in my youth after many exceptionally disheartening experiences. I took some classes at http://www.wesleyanpotters.com/ for example… throwing and just straight up sculpting… something always got broken. Ditto for high school pottery where I did sculpt a horse, it was laying down. Something else in the kiln took it’s head off however…. I was so broken hearted. It was a huge fear that I’d have trapped air so I spent an enormous amount of time hollowing the head, then the neck and then the body out as I sculpted it. I’ll never forget how dismaying that was, seriously. Of course there are no photos.

I had a successful bust made in college – cast from clay… my dog ate it and it was the only casting we’d gotten from the mold (think the mold had to be broken to remove it)... I kid you not… it was plaster coated with stinky shoe polishes. I’m really pretty surprised the dog didn’t get violently ill from it all. He had pretty good separation anxiety and also ate half a coffee table another time he’d gotten out of his crate when no one was home. Anyhow, this was before digital cameras too so I have a few pics of these but nothing great.

All that said? I just still adore clay. So please forgive my manic excitement to be playing with it again. I’ve very very deliberately avoided it to be honest. I had some pottery clay recently but I passive aggressively let it dry out. ;) & Well now I’ve gotten an excuse to give it a whirl again – all this family back in New England that I need to send Christmas gifts too! :) & Ahhhh boy have I missed the smell/feel of it – it makes me feel like a “real” sculptor! ;) This is in NO way intended to diss those of us who are using (still me!) hardening epoxies…. There are a good # of very well known sculptors out there who do stick to Apoxie sculpt.


Some fun areas where I've been having a blast adding texture to the body - so much easier than with Apoxie Sculpt also...!

The next step for me I guess is to find good strong magnets (I'll have time while these are at the casters.. we have a LOT of family - I tend to make 30 gifts or so per year it seems so anything hand done is still a week or more of work... the casters are much better set up for this type of thing!). ;) Anyhow, I think the best way to gift these is probably as fridge magnets… ok, so it’s not exactly “fine art” but then ornaments aren’t entirely either I guess? Anyhow, until we can pop those castings out tomorrow, a little photo essay of the prototype mold making here. The test casting from yesterday came out fine. Some air bubbles but barely noticeable. I’ll be dealing with any of those in the prototype & then letting the casters do the real castings for me. The cost is nearly the same as materials are for me, and frankly we just aren’t that good at it. I’m over here burning myself with hot glue… I have opinions on the way he pours, or accidentally bumps into the clay sometimes too… (but no seriously ! I’m just lucky he’s pouring at all!!!). Anywho, we sure aren’t going to be converting his shop here into this full time. ;)

1st tho; if you were sincerely looking for information on casting let me send you over to read this;
http://www.hhhorses.com/moldmaking.html or recommend Karen Gerhardt's article "Making a Simple Box Mold for Small-Quantity Resin casting" for the issues relating SPECIFICALLY to casting horses (and there are many more than making these flat reliefs... this is just a fun tutorial). If you're looking for info on the materials, may I recommend the many many videos on Smooth-On's site.


Little green test mold there on the blue square (CD case). The indentation is the 'ingot' we cast. I made a little tool, something with little veins on it that was rounded that I can make raised veins on horses with. Might as well make a useful piece. We got white casting resin but a little black dye. Wanted to see how the resin cured with the dye too...


It's so shallow he overpoured a little resin (it's tricky!). I was able to cut it away. We did get the resin with the 7min cure time however because we wanted to have enough time to mix the dyes. We only need one casting per model... so we can wait an hour or more for it to fully cure (it does come out softer even after 1/2 an hour I made a thumbprint on it... interesting.. after 2-3 hours it was normal for resin.


Had to pause to go out and save this Praying Mantis from the dog. They are SO docile! It just flew down & stood there while I photographed it from all angles. Oakes had the sense to get the stick before the dog finally noticed. They fly like whirly-copters... hysterical! :)


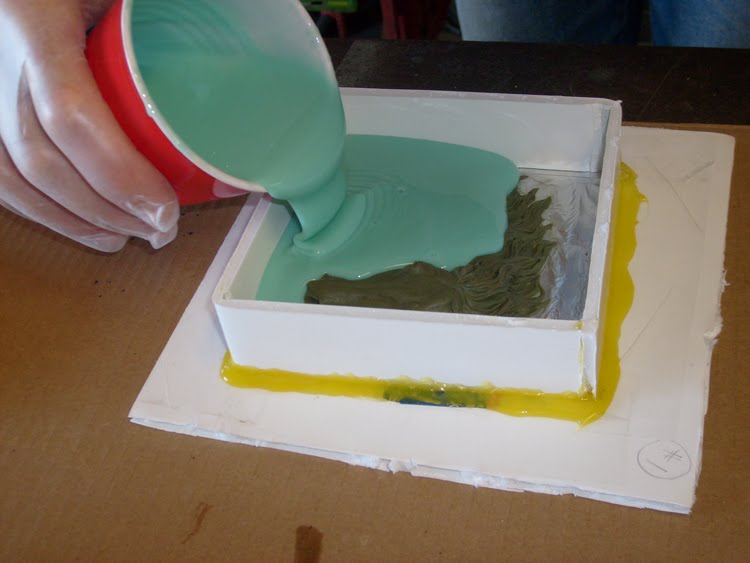
The horses in their boxes... after the first box (horse head) he decided there might not be enough rubber left from the trail size for the second horse so we trimmed up the box (see below)


I love the gooey look of silicone!


Mmmmm tastey! Bye bye horsie, hope to see you again! ;)

Scary stuff for me to attempt but exciting times in general!

Monday, October 4, 2010

Weeeeeeee! :)


Whoa babe hold me down I'm having TOO much fun now...! :D
(forgive my thumbnail please - it's not yellow, it's the lighting I swear!) ;)

Oil based solvents... that's the trick!


Thank you most sincerely for the tips guys - I really do appreciate the input more than you possibly could know & would love to hear more ideas too. Working alone is hard - even with the web out there, its not the same & "studio days" with friends are a luxury months and months apart.

While I know people find commercial art fields inhibiting, working in the group settings in art departments is something I envy. I've gotten to work with some people/art depts at my old corporate job (although there I also was alone and it was a lonely job a lot, not just because I preferred working into the evening - but being the only person in the dept who did what I did was simply lonely work). Also I have friends who have gone into fields with group interaction environments. And as a kid hanging out with my dad at Coleco (a long defunct toy company- smurf figurines and cabbage patch kids are probably what you'd know best?)... anyhow I hung out there a great deal as a kid and got to really see how artists interact while being very focused.... Then of course classroom settings too where ideas fly around fast and furious and hands on demonstrations are constantly possible. Anyhow, reading 'how to's' on the internet just doesn't replace live human interactions sometimes but hearing first hand from friends you know comes really close. So thank you SO much guys!

Sunday, October 3, 2010

Oct 3rd revisiting Thur's horse - mojo goes thbbbbt....


Lol - no no, I'm not crashing... I'm just coming to a point where I either need to learn how to smooth these better in oil based clay (I've tried a # of things I know of but maybe I'm not doing them right).. orrrr I need to give up and when (I'll probably do one or more of these from the past few days as gifts at least for the family), then I can get things smooth... I'm sleepy early (for me!) so I'll let the pictures explain.. I can get rid of the burrs & torn areas, it's areas like over the bridge of the nose, jowl muscles, throat area - these I can't seem to get smooth with tools at hand (like I did the neck with my fingers...)...


Yes some of that darkness over the nose for example is burn-stained clay from my heated tools being too hot... oops!


After looking at the first pic there in reverse I'm tempted to look into the craft store types of casting materials... there must be some interesting stuff out there I bet! Clay is so creamy - just love that! Want to make mermaids and kelp now - YES I'm SO KITSCHY hahaha!!! So sorry! :D (tired too - g'nite!)

Added this on in the morning - DOH! Would help to know this; This is Van Aken clay & is similar to most plastalines but it's less oily than what I'm used to.. waxier too. I think that's part of it. (Oh and rubbing alcohol does very funky things). In water-based clays it's easy to smooth nice enough with brushes, this is an oil based clay I've tried the brush/mineral oil means to & it makes it gummy.

Saturday, October 2, 2010

Oct 2nd's...promising a career in chocolates maybe? :D


These make me hungry - it doesn't look quite so much like a chocolate bar in person... gray-green and all. Flash being funny.

Tonights medallion made during "Gladiator"... I'm inspired to try and do a bunch of different breeds in different doorways. I love the narrow look. My working area will love storing smaller & more narrow clay sculptures too at this rate. ;)

(mmm nom nom man!) :D
The archway illusion was just far too fun to do, it's even deeper than it looks here. I mostly wanted to show how flat the horse was. The tail and some mane/forelock details are still just etched out. I'll be using some further positive and negative relief on them to 'build' depth later when I come back to it to fix it up... for now I'm just setting this "exercise" aside too.

Unless I decide to put this "artform" into chocolate making use... Skye??? Skye??? Maybe you want to make some River chocolates? Cranky Crystal mare chocolates?? mmmm!

Oct 1st evening's medallion - after dinner playing again

Edit later on to post this updated pic that I finally got the camera "macro" setting on to take! :D


I'm not sure these are really going anywhere. I see SO many flaws (relief and flat artwork relying on giving proper perspective doesn't come naturally at all to me). I'm focusing working on improving my eye for proportion in shorter periods of time (ok, well at ALL)! ;) I'm not allowing myself to even take quickie measurements like I normally would (ratio measurements I mean - comparing length of this to that). These are just "freehand" exercises.

It's also a great excuse to bust out with the nice scented candles! (I like to warm the tools).

The goal I've set for myself is to get as far as possible after dinner before going to sleep.... so my fella watched 'The Green Mile' and I just listened while whittling away. Course I had to leave the room during the part at the end that's profoundly sad. I've learned that tear jerkers (I'm a pushover with any), are not conducive to sculpting/painting/anything. Can't work while crying - and even just listening to sad movies can get me all misty and unable to work.

ANYHOW, so we'll see. I may try to make some ornaments for the family for Christmas. It's getting a bit late for that now however. Hrmm.... So at any rate though, this is todays "challenge" to myself. It's like being back in school again...! :D

I may have to focus on fixing up/refining something however... or tossing out.. because I don't have the shelf space for even these... It could get ugly trying to keep any around..! :-P