

Ok, so I've mastered the art of measuring. I kid you not I've eyeballed out the 2 pt mix resin volume for both castings with zero to spare. This is what remains of my drinking-games days. I used to want to bartend and would pour perfect shots every time into any type of cup. I guess this helped in the lab too.. except for when I spilled acid all over my benchtops. Yes, not the field for me to work in. Here you see how I spill all over the counter. Got the right amount inside of the cup... but a little over here and there too. (This is also why bartending never worked out for me either). ;)

My fiance did the other pouring... here's what happens when I try to pour gooey liquids.. this isn't the half of it actually. Somehow it got ALL over all the bottles. Wasteful wasteful tsk tsk -sighs-
First we did white resin;
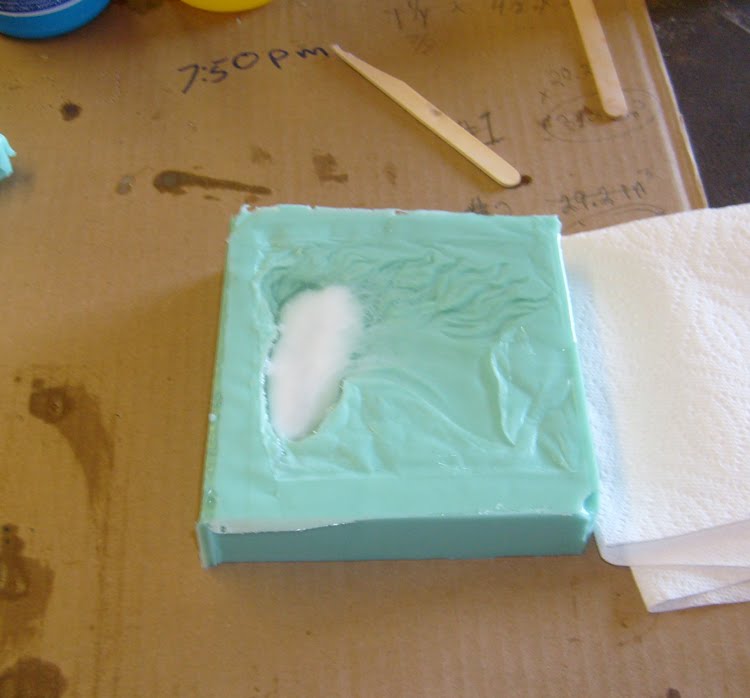
The mold is full of clear liquid - this is really hard to show of course. Then when the reaction starts to happen this cloud of opacity spreads out. It's quite cool to see. I am wearing a mask & there's a big fan going on over here btw.
So I could see in the white resin that there were bazillions of little surface bubbles. So I decided to just give the black stuff a test again too. Yesterday's test of the 2 colors (normal white or with black dye added) showed interesting results for how the bubbles broke up differently in the black dyed one. Could've been temperature, stirring, our own mixing ratio differences. Lord only knows, seriously! THIS is why I don't have the slightest interest in casting my own en mass. I see these small armies of castings my fellow sculptors turn out and my hat goes off to them. We'll see.
Air bubble fest - this is NOT a surprise, I knew this was the main issue to begin with (the 2nd issue being consistently mixing things properly. Some swear by this or that, my own casters use baby powder and swear it's the reason they don't get surface bubbles. But they don't use much release agent as a result. Anyhow, so I wasn't sure they could mix - twas digging around online just as Becky Turner's comment off of my last post came in & she described to me how the baby powder can go WITH the resin release (and to tap it around like cake pan coating) so we'll see. I'll wait until the casting is done in another 20min before I post this!
My first castings in pure white (also helped to clean off clay from the mold - interesting!) were ok for a first try! I'm trying to fill in the grass on the standing boy & the mane more on the head so that these will be thicker for production castings. Thin on any kind of casting lead to bubbles and uncast spots. Anyhow, though, I got little eartip missing holes and nostril bubbles, the bigger kind... and millions of wee ones that hadn't quite broken the surface so they look like a small disease coating the surface? Soooooooo we went with a different pouring/mixing style and black dye to confirm that we stink at this! :D No seriously, you have GOT to enlarge these to understand just HOW MANY bubbles there are. These are nearly impossible to salvage;


I'll admit too that I'm a little sad the detail isn't as crisp as I thought it would be in some spots, although the above photo is out of focus on the horse and focused more on my finger prints -wow! This though is precisely why I wouldn't have sent clay to be cast finally & left off the facial vein there too.

Btw, the mane flashing excess is intentional - I sculpted the mane tips pretty thin so we leveled these where this area is (if not100% level) going to be the planar low point.. thus it'll be the thickest point of the casting. And all I have to do is trim around it and carefully cut out the loops & whirls.
I still wuvs the nosie nose though! :D (If you enlarge this you'll see the air bubbles at their most shocking!!!) (:-o Ok, I think I've figured out what this is... it's Falcor from the Never Ending Story isn't it... I'm SO unoriginal I really am! UGH!
Anyhow, this one isn't as bad as the next one WITH baby powder - believe it or not!
I'm gonna run for now and go look up some things about this. The lowest/deepest spots where it catalyzes first are the spots where the most bubbles form up. And we're pouring slow, thinly, and doing it all as they tell us to. With and without dye too. Time to watch some online vids & find a trouble shooting section.
Well truth is, if I have to I can work with the one in my hand here. The black (which is blue to purple in reality unless a LOT is used)... is nice at least for showing every little flaw very well. I would have all my resins cast in black except I know it's more work for the casters and surprisingly few people want it because many people start painting with white primer (verses reds or greys).
Ok, off to research during this next half hour. I'm very pessimistic about the one we just poured given how the bubbles coalesced in the same way as the worst one before it. Hrmm... ;)
Edit 20min later to add this in;
Hmmm castings get worse as day rolls on...
http://www.smooth-on.com/faq_display.php?faq_id=3&cID=2 (so many possible things to rule out!)
like... hmm..
Humidity has gone DOWN today here but maybe not in the work building I'm using?
Release agent here sounds like the # 1 likely suspect from what they're saying.. it's time for me to demold the next batch so we'll see..
Edit ~1hr later to add this in;
Seems like the bubbles continue to come from the most creased parts of the mold. Trapped moisture? Release agent still?
White castings came out ok.. possibly the least pin-holed (no release agent used, just powder - thinking there may be some release agent still trapped inside however). Now black (with less dye) is curing up as I type.
My fiance officially finds this to be NO fun. I asked him if he's enjoying being surrounded by horsies and he said "no"... :-/ My hand-steady skills will have to improve here for this.
This stuff is expensive to be experimenting with like this. This is why I'm watching, taking notes all over the place (the flashing on these castings is covered in notes). :-P
It's almost like science again. Except unlike microbiology I can really see this stuff sprout to life before my eyes! (The child in me is gratified). ;)
8 comments:
So, so, soooo cool! I want to kiss that muzzle. I think I'm going to have to start painting.
Hi Morgen,
You're in the worst bit now, give it a day or two and one or two perfect casts - and you'll be away!
Firstly, one worry I have - I've ruined a whole batch of resin by leaving the bottle open on a humid day - Smooth On resin seems extra-sensitive to humidity, although mine was the clear stuff, which is worse. Be sure to keep those lids on and if you really struggle, there is a spray you can get to keep the air in the bottle dry, which works a treat. If you've got humidity into the resin, it will be a nightmare to cast with. Again, there is an additive (Doxy-5) that helps with de-airing but if you're using pint bottles, you should be fine (I use Gallon bottles).
Another tip to add to Becky's about bubbles - not one for casting hundreds of copies, but useful when trying to get a good prototype; get hold of some disposable paintbrushes, 1/2 inch or smaller (I use those plastic bristled kiddy brishes, about 4mm across), find some that are cheap and that won't shed (plastic bristles seem to work best) as it will ruin them.
This is a bit tricky especially if you use a fast-curing resin but I use it for models with ears and noses that are prone to bubbles. Simply either mix up the resin, pour it and then use the paintbrush to sweep the surface therefore taking the bubbles away (good with Smooth-On as it's so clear), OR, if the resin cures too quickly, mix up a small batch first and push into all the crevices and bubble-prone areas using the paintbrush, removing as many surface bubbles as possible, then as quickly as possible mix up a second batch and pour it - this needs to be quick as the resin shrinks slightly when curing (more so on larger sections where it gets hot, small bits are fine) so multiple-pours can lead to stretching/shrinking problems sometimes.
Final tip, once you're done pouring and before it cures, give the liquid resin a quick, light spray with the mold-release (I use the same one as you, it's great!), this will break the surface tension on the back-side of the medallion removing any bubbles, and give you a lovely smooth, glass-like finish to the model's reverse side. I can't remember if Becky told me that one - us mold-makers talk ALOT, hehe!
BTW - Hi Becky, I'm sure I owe you an email...
Good luck Morgen, it'll all be worth it!
Forgot to mention, I put loads of photos on my Picasa Albums about casting, failures and successes, they're at: http://picasaweb.google.com/Madrabbitwoman
In the Albums called MECs Mini Medallion and MECs Medallion, and there might be some more in the other albums too.
Do you check out Lesli Kathman and Joanie Berkwitz blogs too? There's another artist too that reports on mold-making, I've forgoteen who but they'll be linked on those blogs I'm sure, they are mostly for china-casting, but the principles follow, you might like to check them out too.
Well we're using Smooth on 305. The trial sizes. We've got enough left for a few more castings still. Even though the material may be ruined by exposure to air.
I had a talk w/tech support this am. They said it MIGHT be too much mold release used. The 2nd batch where it all got ugly we both accidentally sprayed mold release in? You know, too many cooks in the kitchen & everyone of them adds in some pepper? ;)
The other suggestion they had was baking the mold itself in an industrial oven at 150 (or a hot box) for 6hrs.
With the 5 castings we've made so far the progression is
# 1) good, not perfect but pretty good- very few wee tiny pinholes - just mold release used
# 2) dyed and as you see in the photos in the blog here - just mold release again but much more tiny pin holed (fewer air bubbles of normal size - so better pouring technique but MUCH worse)
# 3) where we both add release spray - just awful! Looks lke the horses have severe warts. Never seen a casting in the thousands I've handled like this - sincerely! lol! mold release AND baby powder used there (but by now the mold release has got to have built up to far too too much)
# 4) just baby powder and a lot better than the last
# 5) Almost usable, again just baby powder and the bubbles are all in the exact same spots as the before - just fewer...
Sooooooo we'll see where we get today - if I try too many more. This last one didn't get dye by accident and watching it cure (mask on don't worry!) ;) I saw far fewer bubbles and the back pattern of wee bubbling too looks better than the previous...
My first ones may very well be the ones I have to go with. At least I have options and WOW do I have perfect pin-hole filling demonstration material here! ;)
This stuff you're describing Kelly scares me to death! Brushing resin around? hahaha Omg.
I called Smooth on this morning and of course they suggested I buy new resin, I must've contaminated mine... I'm not so sure, given that I'm seeing improvement now.
IF I do wind up going with new resin at some point (probably not now since I do have something usable here out of all of these for production with not too too much work - and I'm going to save my pennies and let the casters deal with these).. howevr that said, these won't be the last I cast SO if/when I do more and am up for it I may try the brushing resin around biz. That sounds far too advanced frankly. lol! ;)
Sorry Morgen, I didn't mean to scare you, but thinking back to when I was starting out everything did seem very scary - all I meant was, if you can see the bubbles in the resin while it's still clear, you can use a paintbrush, sculpting tool or anything really, to pop them or scoop them out. You just need to get the bubbles away from the rubber surface, it doesn't matter if they end up deep inside the model as long as they're away from that surface.
Don't worry about getting in there and poking about - until it starts to thicken before going white you can poke about all you like. I'm currently using grade 300 resin which goes off in about 3 minutes flat, the slower stuff is better for getting bubbles out so I'd say 305 should be ideal for you.
Silicon rubber actually doesn't need ANY release agent, it extends the mold life but is not essential, so go without for a few casts and that will fix the problem of the overdone release agent.
I'm not scared. I'm baffled. Laying out the castings chronologically I see the downward spiral of bubbling.. and then improvement after release agent stopped being used.
THAT said, the head had more bubbling at the surface this time (it's curing as I type)... whereas the shallower casting, the whole body, has less. Sooo this makes me suspect the mold might need baking. That humidity and/or release agent pooled in it & needs further decontamination.
We'll see. It's SO hard to judge by the flat side. I just hope not to find massively warty heads. That's horrid! lol!
Of course we only have so much to experiment with here with the trial sizes.
My fiance here who's a chemical engineer is very miffed by it all. He doesn't need to think about it. He doesn't like things that have so many variables.
I can't see myself poking around inside it. Especialy when I can't see with the dyed resin. How on EARTH do you get such GORGEOUS castings in metallic resins??!
Hey guys,
well hmm.. oyu know i had this happen to me one day.. everything I poured had pinh oles.. drove me nuts. adn I knwo hte resin was ok.. I tried it a different day nad htey came out fine.. so Im betting the humidity has something to do with it.. also.. when you do use a release.. spray very lightly adn wait 10 minuetes! I dont always wait .. i have been lucky but it might help the stuff to settle some.. then use the powder... or just try on a dryer day humidity wise and see if there is a difference.. I just have a feeling its not the mold.. since I have had the same thing happen on a mold I knew was ok.. I had used it many times and it was fine but that one day drove me nuts.. no matter what I did I was getting tons of tiny airbubbles... now you know the casters have the machine as I think kelly does now too.. to degas or de bubble the resin... or rubber.. you put your resin in it( but I think you need the longer curing resin then) and it takes all the air out of it.. then you pour. Id get one but I have no room.. and to be honest I dont get prefect casting.. close but not quite..I always get a few bubbles someplace... oh and I tip for next time on the ear tip problems.. you can either cut little places out in the mold at the tips of the ears( like extend the ears) and then after casting cut them back so the bubbles will form in that extra area or on the next sculpture sculpt little sprue like things on the tips of the ears or where your getting air holes at the tips of places.. so they form in that sprue area and not the ears.. then you just cut off the sprues or extra bit.. anyways.. good luck! and smack your guy on the butt ! he being what he is ( chemical engineer) should be helping you out! shame on him... lol..
Becky
Well it can't be residual mold release. It was better (almost hte best) this morning. And then almost the worst int he following one.
The dye was used on the 2nd, almost the worst one here (around noon).
I've decided that if it's humidity in the workspace, there's SO little I can do about that here (open barn type workspace - I am not bringing this stuff inside and it's hard to keep it "dry" on my humidity gauge here in the painting area). I picked the driest days we've got but well... it just happens down here in the south.
I may send the molds to the casters and ask if they can cast me the proptypes in grey so i can get really crisp detail.
Also, my trial size is probably shot. Everyone tells (warns me) it has zero shelf life so we got the very small size.
How odd all around. lol! At least I have 3 castings for each sculpt that are very usable for prototypes.
Btw Becky, the worst of the pin holes are off of the flat expanses actually; belly and forehead. These aren't typical trapped bubbles but "champagne" style tiny ones forming at the lowest points of the mold. Which is why it seemed like mold release excess could've been involved (this stuff sinking down). However it going from good to bad again means it wasn't that (since I haven't used mold release in many castings? right?).
Sooooo maybe the smooth on salesman (opps I mean technician - ha! Freudian slip there!).. maybe he was right & water is contaminating the resin materials itself.
Or the dye. Which STINKS because I really can see flaws 10x better UNDER the resin - where lumps and divots might occur in the future. Sure I can primer over the white but that's not as helpful as having a dark opacity to see lighter trouble spot areas.
I'm really going to do a post on pin-holes. It's amazing to me how troublesome they can be down the road too (granted my need is for wee pimple lumps to just stay away for a few weeks at best). ;) But I've seen so many resins where they come out years later under paint jobs. They gotta get popped! Anyhow, ok, well off to see what the last castings did.
I suck at this.
All I could think of to do for these last ones were to powder/dump/powder/dump (smack the mold a LOT) & then really have almost no powder in it afterwards.
For all I know the air hose he has out there has gotten moisture in it (although again the first one was fine and it has a moisture trap_)...
Too many variables.
I could see myself encasing horses in rubber and sending them to friends or the casters who can demold and make waste castings.
Ptttbbbt. Not a caster over here. I've known this from an early age! :D
Post a Comment