Monday, May 16, 2011

Preparing for a fun all ages workshop this summer!


It turns out that everything fell into place for me to go to Lexington KY this summer again to attend “Breyerfest”, a 3 day extravaganza of horses and all things horsie, for all ages. I’m going to be teaching a workshop there and will have a booth Thurs, Fri, and Sat nights at the Artisan Gallery held in the hotel formerly know as HIN.

So for the workshop I’m tasked with teaching malleable young minds to sculpt horses in a mere 2 hours. The kit is actually pretty comprehensive and I’ve seen some impressive results from it. There are of course really tricky aspects to sculpting, things that artists often take for granted until they try horses… and of course I’ll never be able to cover everything.

Thus the aim will be to find a way to inspire and teach kids what tools work for learning.

As to being inspiring, I figured it was only fair if I tried out the kit myself first. Believe it or not I’ve never sculpted with Sculpey (nor Gapaxio nor some others – Apoxie Sculpt gal that I was!). Anyhow, so this was my one off interpretation of the horse in the book with a head tuck and very very minor leg deviation... and of course a whole different build. Because the point being "all horses have the same build no matter how big or small"... and proportions not so different after all (although a little - even armatures rarely need to be modified). Weighty topics eh? lol! (I'll have to try to be a bit more fun that than I'm sure). ;)

Anyhow, sooo… if you look closely at the 2nd picture here you can see the cooked flesh coloring of his hocks. I have lots of friends who use Sculpey and I’ve seen these macabre overcooked bits hanging around in their studios too… so at least the playing field is leveled somewhat in that I can tell the kids what not to do (good god whatever you do – believe people when they say NO to the toaster oven concept… I have a friend who can pull it off but only because she’s doing tiny heads in there… fire danger yikes!). My favorite is how it bubbles when overcooked. I’ve also undercooked it so far. Good times!

Meanwhile, I did try to create a horse that matched the pose of the book.. which a fairly simple modification to make it more Fairytale Friendly! :D

To me it strongly resembles two well known artist resins, my fiancĂ© disagrees but well, I dunno. Cantering in static, stand alone positioning only leaves a few options for poses. The armature is a bit thick so I went with the heavier horse. I can’t decide if he’s more Shire or Friesian. ANYHOW, bottom line is I may leave the off side undone so that can be see “in progress” too for the attendees. Obviously if it took me a day and a half to make that I can’t possibly expect anything much in the course of a few hot and sweaty hours! ;)

I’d love to hear any suggestions from past, present and future Breyerfest workshop or other sculpting workshop attendees. I’d really like to make the most of 2hrs and supporting materials, while not being overwhelming.. and not being toooooo dry or too flakey. ;) I have so many ideas for them, yay! Love having fresh young minds to convert – opps! – I mean mold! ;)

********10 minutes later adding this in... *********

OPPS! Ps to all this... as I was looking at the uploaded photos I realized the 2nd armature wasn't bent yet fully.. (back hocks not "added" yet, had to bend those in to match the pic in the booklet)... truthfully I literally just popped him out of the box and put him down next to his more mature brother. ;) Bent his head under, moved his legs just a tad and mostly to make him stand and snapped the pic.

Friday, May 6, 2011

"Little Man Mango" wrapping up...

Added Mon May 16th! Opps! I thought I updated this post a whole week ago. Maybe it didn't submit properly. Anyhow, well Little Man Mango reservations now up being taken, details on my website. He's only available until June 7th (3 more weeks): http://www.artbymorgen.com/lmmango.htm


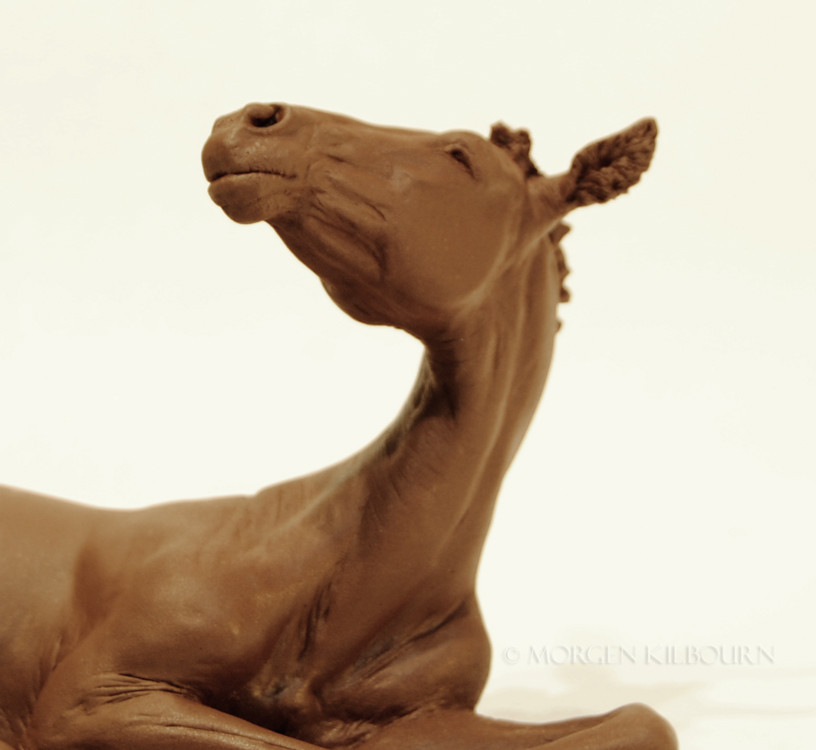
A favorite angle.. I feel sleepy like this myself! In the enlargement you can probably see his sleepy eye lids - actually very easy to find references of all kinds too. Lots of tired babies out there!!

One week later and I’m ready to start down the homestretch with this Thoroughbred colt! Ok, sorry, Derby fever over here!

I’ve spent the majority of the past week adding the rest of the feet and legs to this colt. If you compare with my last post you’ll see that the bottoms were shorn off. Since I initially started this sculpture last month in fun I didn’t want to get the piano wire out and try to pull him up, put in more underneath & create the bottoms of the legs. It wasn’t that hard to be honest to do it post-casting… just a lot of detailing/smoothing out.


I think this is is one of my favorite shots for all the fun details I got to pack in because he's all scrunched up.. any second though he's going to tip over and stretch out again however! ;) Ah but no seriously, you can see a lot of the detail in the enlarged pic. I'm still not happy with these shots. Lighting either washes out detail or hides so much in a work like this where there are nooks and crannies like this. Back into the photo studio!

Now he’s gotten every little divot and detail addressed. I confess I give these production master sculptures a wee bit more of a once over when the primer is fully dry. This prevents things like ‘dusty’ or gritty details in areas like the nostrils. So what the casters generally get in a master isn’t as photogenic, the primer is buffed here and there and not uniform in color (but smoother than sprayed on primer is).

At any rate, so I have that to do this weekend – but first I need to get the final ‘product shots’. I haven’t picked a day to release him but it will probably be next week. I’ll be informing my yahoogroup first. They will certainly be the first to see the final albums! ;) But here are a few shots for my loyal blog readers in the meantime!!! :) More next week..

Added in Friday evening...One last pic for today;

Friday, April 29, 2011

Ok, I just gotta share the follies! ;)


Ok! So there are now two little guys falling asleep here in the sun on my back porch!! :D

Watch em tip over and sprawl out flat in a second.. ;) (actually I probably will want to move them to the shade now but I really REALLY really want the resin to be fully cured. I was out there nearly in a Hazmat suit mixing the chemicals.


The bottom one is supposed to have a hole just under his chest/forelegs there but that was a flimsy bit of rubber making the hole & it came off with the first casting. I kinda suspected it would . It would've needed to be a bit more complicated of a mold - and that's a pretty easy area to hollow back out.

And if you click on the (distorted view!!!) enlargement below you can see two funny things... a chunk of the rubber fell into his nose and got cast in there (purple lines just under the surface)... and the seam lines running down the bridge of his nose and off his cheek - rockingly clean casting eh? WOOOT!


And I've still got a good deal of work to do with either.... The first one cast out with a goodly # of flaws - crinkles here and there that didn't come out in the second. I believe it was from the mold release as I put it in only in a few spots but that's where the crinkles liked to center. The first casting didn't come out with both ears so I tried again. The 2nd time the ear came out - woot! Buuuuut with a bubble so it broke. Easy fix there as you can see (right ear on the bottom fellow). He came out even cleaner than the first guy. So I'll be smoothing out and adding a few more details onto him.... then he'll be ready to offer to folks! :) Probably won't take more than a week to do right. Yay!!! (does happy dance!). :D

I wasn't going to share but seriously. How freaking cute are the sleepy foals tipping over in unison in the sun? Meanwhile, those who know molds and casting can look at my monstrosity that I'm totally filing away under "wow I can't believe I got away with making THAT work" ... ;)

Photoless Friday? lol! :)

I probably won't show "in progress" pics of this until I'm 100% satisfied. I didn't have a spare clean hand to take pics of the molding anyhow. THAT was interesting...

Adventures in making a waste mold of the clay foal.... The mold rubber I have been using here normally was on backorder. I order smaller quantities because I don't use much for the little medallion type things. BUT I have 3/4 of a new container here... so if the preferred product hadn't been backordered for a month or more then all would've gone just fine.. But if all had gone well I wouldn't have had to improvise like I did.. & isn't that half the fun?

Sooooooooo I'm using the alternative rubber. It has a 'Pot life' of 45min. That's pretty fast. Meaning it started to change consistency at that point and you'd better be happy (it still is something you want to pour and walk away from for half a day though). It's nice and thin (low viscosity at least) so this honestly helped. Helped me to see when it started to set and helped me to do what I had to... Dribble much? It was like being back in college except that I was a lot more careful with this stuff than we were then! lol! I poured all the rubber I had in after mixing (that's a pita in and of itself actually becuase you want it all to be started and curing at similar times... at the same time, I simple didn't have clean disposable containers big enough. Anyhow, got the rubber half way up his neck and then - ooops! No more.. Scrape the container all you like missy - that's IT! lol!

Sooooooooooo now I've got a bit of a dilemma. Leave the clay head exposed like a little buried dad at the beach? Or find a way to cover more. So I set about to tilting the whole heavy ensemble.. Not quite enough. Even the ears are still out (and tilted they are now the lowest point to give you a frame of reference...).

SO THEN, a big ole light bulb goes off - ding! I study the body and try to really recall precisely how much space he is taking up... ready for this crazy idea? I bury more clay around him to displace the rubber further.

It ALMOST WORKED COMPLETELY!!! Ugh!!! So close!!! So I've sliced up clay and have slowly sunk it down the sides of the mold into the rubber.. keeping in mind too that they have to not want to fall in due to the box being tilted so extremely... I've got almost nothing left. I start spooning some of the mold rubber over his little face (which is kind of fun with his eyes half closed & all - like bathing a horse, well one who likes it anyhow!). It's thin but it's thickening so it starts to not pool off but stay a little. So I approach this more carefully as I'm now using the brush on method with a hard applicator so I can't actually touch or press but viola!

Course the real trick was doing this for a while until it went from thin pancake batter to ... uhmmm... what's a good universal food ... shoot... yogurt? A nice creamy yogurt consistency (I eat Greek yogurt so that's more firm & it wasn't like that). ;)

So of course today I have the final hurdle to overcome.... now I've got a slanted "bottom" to my mold. Fortunately it all cured wonderfully last night. At least on the outside. Now in a few minutes I get to flip it and demold and see what I've got inside. Crossing my fingers like mad!

Meanwhile, the bottom is leveled off with plaster - woohoo! So it's all out on the porch drying in the sun It's actually like a little mother mold and I thought long and hard about peeling off the sides and making the plaster into a half box essentially. I'm not going to most likely but who knows, the demolding... this could be ugly. It's been literally 15 or more years since I had to deal with a more complicated shape like this...

Wish me luck today!

Storms being a distant memory the humidity is falling below 50% now and dropping... I have probably only enough resin for one maaaaaybe 2 tries at this foal so I am crossing my fingers. I have a backup media here to work in although it takes 24hrs to set though but all the same, this is why I decided to have a go at it myself. The costs here are high enough (iow this stuff aint cheap to play with!).

I really am cracking up about my rubber displacement however. :) Course I have to leave the clay in there most likely until I'm done (at least where it's closest to the body) so there's no chance of deformation...

Wacky artist over here signing off for more adventures now! ;)

Monday, April 25, 2011

Necessity being the mother of invention...

This is often how I come up with new things. I want to try something out. In this case I *need* to try out a small test batch of rubber before making a mold on my foal. So I made this new widget while watching the last Harry Potter movie. Ok, can I just interject this? The PPV tech I called & spoke to called it Harry Potty - seriously - who stole my friend Jess's nickname for him? lol! Love it! Anyhow, the movie being pretty dark & me watching it during the day... well, I couldn't see much so I was pretty productive (although my eyes got less rest as there was less glancing up for eye-strain breaks).

And there you have the story behind this. I was watching (finally!) the 2nd to last Potty movie.. :D

Shown 2 to 3x larger here it's a 1 and 1/4" wide by 1 and 3/8" tall very shallow (and oily!) relief...thumbprint sized basically. Another widget for the envelopes mostly. I'm undecided on if I like them for other purposes. Maybe someday I'll go in cahoots with my jewelry making cousin Katie. :) (snaps for Katie!!! <3 http://www.etsy.com/shop/katierosenblatt?ref=pr_shop_more )

Meanwhile... in the more global scheme of things.. there are artists who are 'idealists'... some are 'surrealists'... etc etc.. So I'm wondering if I should label myself 'the pragmatist?".... (weak!) Anyhow, gotta work on the story telling behind these works! ;)

Friday, April 15, 2011

A little helpful trick for the sculptors out there

It's really not a big trick, some sculptors like to have mirrors for this, I find I like sheet of paper with the contrast ramped up to really emphasize the contours... I take a photo of one side, flip it, and bump up the contrast. In truth I take photos from several angles but you get the idea. :)


Above first is reality & next is the grayscale higher contrasted version.

More refinement to come but I've ordered the molding rubber and hope to offer him extremely soon... hope you're on my yahoogroup if you want one! ;) Ah but seriously, I just can't help it being soooo excited about this guy and I'm using the excuse that the pony is going to be a lot more technically challenging to mold (I'll have to have a pro do the waste mold for me - this foal at least I can do the waste casting myself! yay!).

I shouldn't show these (even though I had to take em to balance out a few facial tendons & muscles) because the clay has blemishes. Blemishes being these darkened spots where heated tools discolored the clay... Anyhow, he'll look vastly better in close up in a primered state next week... but I can't help it, he's just the cats jammies to me! :)

And now back to painting actually... believe it or not that's mostly what I've been doing here..

Sunday, April 10, 2011

Sat. in pictures (Stoneybrook Steeplechase)


I'll keep it brief and get right to the photo show. I had a booth and managed to sneak out a few times to get reference material for myself. Here's a small sampling...


The booth & you already know what I look like from previous posts so I won't torture you with the ones my fellow took of me attempting to smile nice (and looking pained which is typical for me when I know cameras are around).


Duke and Johann received the most pets - yes, they had do not touch signs but there is just something irresistible about sculpture... there really is. Your typical collector is well trained not to dare to touch the breakables but I was fully prepared for it (I mounted them to marble bases). Collectors would faint to see someone rub their nails over a finish and ask what it's made of... ;) But it's all good. I built my demo gang to roll with the punches. ;)


I got some pained ones of my fellow too but then managed to make him laugh over something & got a real smile. He was indispensable! Setting up the track lighting alone would've been impossible for me and you can't tell from the photos but it really made a difference.

And on to the real stars of the show. I took most photos from the backstretch. The majority of the other side wasn't approachable as it was "box seating" roped off and with private tents. So I tried a few spots and found the best pics for my purposes were on the backstretch (3 hurdles worth). The downfall was that I couldn't see the finish of any of the races.


I did burst photography of this race's start. They walk in circles around the starter counter clockwise and then reverse off and try to walk as calmly as possible to the "line".. whereupon the man flags the "go" and runs like heck... this small field of five made it look pretty scary but to imagine this with a field of 10 or more is rather hair raising!


And then to finish off with an "awww" moment! :) I didn't see this get much use but I dared a few folks to try it out (I kinda wanted to myself but well, I had a dress on.. that's my excuse and I'm sticking to it).

Fun day and while a really raw cold front apparently cut the crowds in half, it was well worth it. Can't wait for next year! :)

Thursday, April 7, 2011

I dabble in drawing but generally..

I dabble in drawing but generally.. I don't share.. for a # of reasons. Primarily because most of the things I draw are straight from a magazine or book. It's an exercise, and while I might not be selling it here even by sharing, putting anything on the web these days is a big thorny conundrum.

Anyhow, it occurred to me that I've got all these great photos of horses now that I took myself these past few years, and that I should draw those instead & share those pictures. Again, these are just exercises. I really just don't have the photorealism "it" factor imo in my flatwork (drawing or painting). But it's good for me to explore shapes and light and dark spaces in 2d - because it helps to grasp shape faster in 3d sometimes if you can "explain" it visually in several ways.

Well so anyhow, here's a cute scratching pony from this past fall's trip with Maggie to Shackleford Island; the original and what I made of it.


Again to see more pony pics check out some I made into an album here

Yes, I did do professional illustration but each and every drawing I did there imo could be greaty improve upon. I'm a harsh critic of my own work but the one thing I had going for me there the most was how fast I could turn around an assignment - lol! In other words, I decided that other avenues (for the longest time graphic animation work and computer illustration) were better to pursue.. until of course I rediscovered sculpting and casting medium improvements and then tossed aside the mouse. ;)

These "sketches" and widget type exercises I've been sharing here are things I take on in the evening when I'm supposedly done for the day. I'm really lucky my fiance doesn't find me boring. I'm pretty obsessive. Guess it comes with the territory. :) & With that, back to it then!

Saturday, March 26, 2011

Scenes from a soggy event today


The soggy event was the Southern Pines Horse Trials II. These were taken from our vehicle! It was pouring and I got out and walked the dog around and talked to some folks but my fiance was having none of it. I wasn't about to bring my studio camera out into the rain however so towards the end he drove across the park and found this water combination where I could actually capture the last few riders going through. In better weather I really would've gotten some fabulous reference pictures from up close. I have some good ones at least. I share these just to show the place a little. My most reference worthy pics have cars in the background and such! :)

I've gotten so much feedback about the foal too. I'm very happy to know it wasn't "just me" thinking he's the cat's jammies! :) I'm plugging along on him & "Kipling" (the pony on the stick from a few more posts back). They'll both be released in resin soon enough, I promise. In the meantime I'm trying not to post photos each and every time I make some changes, keeping a bit more diverse for the reader here. Mind you my life usually (bad pun coming up warning!!!).. is normally pretty unEVENTful... sorry. Had to do it. :D Anyhow, perhaps after the fact I'll share the clay-mation to hard prototype stories. I'm rather anxious about that though and would prefer not to jinx myself. One way or another I'll share more soon but I simply don't know yet what I want to do. I'd said to my yahoo group tentative plans for selling the pony as a very limited time frame. I'll have to see how that works out. I'm overall shooting for being more prolific as a sculptor in general, and thus (out of necessity!), limiting edition sizes a bit more. So this is my generalized goal and we'll see how it works out. You can probably bank on being able to totally laugh at me later this year and say "gee Morgen, how's that working out for ya?". ;)

Thursday, March 24, 2011

Foal's first 24 hours...

Man sometimes the germination of artistic idea is just like a little lifeform, you can not stop it from growing. For better or worse. In the euphoric state that is the true creative high of course I hope it's for the best, I know at least his neck is a shade more proportionate & his limbs are the matching lengths now at least... so here's Little Man Mango at just 24hrs old (in real clay life, in representation I'd call this foal a few weeks at least)..


I was up until 2pm last night and right back down to it this morning, couldn't slurp down the coffee fast enough & get back in there… didn’t even want to stop for lunch. He’s now in the freezer again chillin out. The studio thermometer says 85 in here but the breezes/fans are cooler. Still, clay gets pretty soft at that temp (sun heats this place up, yesterday's highs were mid-80's I think but todays was also almost 10degrees less too)... all the same, time for the ACs in here already... I have armature toothpicks in his ears even!

In the photos the tools are for showing “in progress” for another purpose… but I know you guys know that he’s just starting out here. Still – I’m sooo aching to be putting in all those awesome fun baby details!